Hydroponics farming is an innovative method of growing plants without soil, where plants grow in a nutrientrich water solution. This method of farming is gaining traction in India due to its efficiency, especially in areas where arable land is scarce or traditional farming is becoming unsustainable. Hydroponics allows farmers to grow highyield crops using significantly less water compared to conventional farming methods, making it an ideal solution for India’s waterscarce regions.
In this stepbystep guide, we’ll walk you through how to set up a hydroponics farm in India, from understanding the basics to setting up the system, maintaining your crops, and harvesting.
Step 1: Understand the Basics of Hydroponics
Before diving into setting up your hydroponics farm, it’s important to understand the different types of hydroponics systems available. The most common types include:
1. Nutrient Film Technique (NFT) – A thin film of nutrient solution flows over the roots of plants.
2. Deep Water Culture (DWC) – Plant roots are submerged in a nutrientrich solution.
3. Wick System – Nutrient solution is absorbed by plants through a wick system.
4. Ebb and Flow (Flood and Drain) – Plants are periodically flooded with nutrient solution, then drained.
5. Aeroponics – Plants grow in air with nutrient mist being sprayed directly on the roots.
In India, NFT and DWC systems are the most commonly used due to their simplicity and effectiveness in growing leafy greens, herbs, and even strawberries.
Step 2: Choose the Right Location
Selecting the right location for your hydroponics farm is crucial. You’ll need a place that offers:
Adequate Space: Hydroponics systems need to be set up with sufficient space for racks, pipes, and water systems. You can start small with a rooftop or balcony farm, or opt for larger indoor or outdoor spaces.
Climate Control: Although hydroponics can be done indoors or outdoors, a controlled environment (like a greenhouse) can help optimize conditions for plant growth, especially in India’s hot climate. Temperature control, humidity control, and artificial lighting will be essential.
Access to Water and Electricity: While hydroponics uses less water than traditional farming, access to a reliable water source and electricity for pumps, lights, and fans is essential.
Step 3: Choose Your Hydroponics System
Now that you understand the basics and have chosen your location, it’s time to select the hydroponics system that best suits your needs. For beginners, starting with a Nutrient Film Technique (NFT) or Deep Water Culture (DWC) system is ideal. Here’s what you’ll need to get started with these systems:
Nutrient Reservoir: A container to hold the nutrient solution.
Piping or Channels: PVC pipes or trays through which the nutrient solution flows to the roots.
Water Pumps: To circulate the nutrient solution.
Air Pumps and Air Stones: To provide oxygen to the plant roots.
Growing Medium: Items like perlite, coco coir, or rock wool are used to support plant roots in place. pH and EC Meters: To measure the acidity and nutrient concentration in your water.
Step 4: Set Up the Hydroponics System
Once you’ve gathered all the necessary materials, follow these steps to set up your hydroponics farm:
1. Install the Frame or Rack
For systems like NFT or DWC, you will need a frame or rack to hold the pipes or containers. You can build this frame using metal or PVC pipes, ensuring it’s stable and can support the weight of the plants and water.
2. Set Up the Nutrient Reservoir
Place the reservoir in a location that’s easily accessible for refilling and checking the nutrient levels. Ensure the reservoir is big enough to hold enough solution for your system.
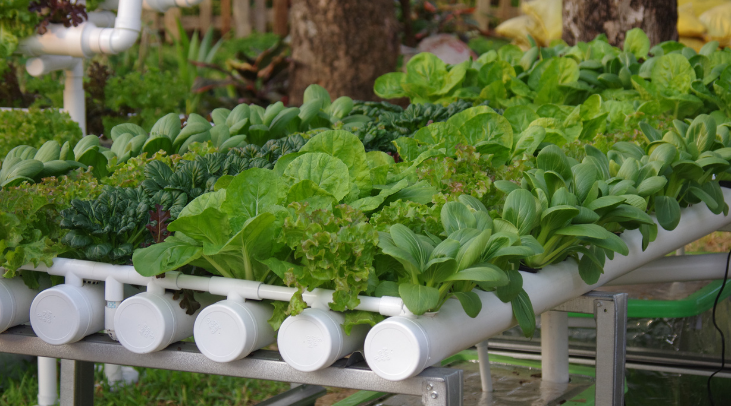
3. Install the Piping
Install the pipes or channels (depending on your system) to transport the nutrient solution from the reservoir to the plant roots. For NFT, you will need a slight incline for the solution to flow smoothly.
4. Place the Plants in the Growing Medium
Place the plants or seedlings into your growing medium and position them in the pipes or channels. The roots should be in contact with the nutrient solution, but the plant tops should remain above the water level to receive adequate light.
5. Install Pumps and Air Stones
Install water and air pumps to keep the nutrient solution circulating and provide oxygen to the roots.
6. Set Up Lighting (If Necessary)
If you’re growing indoors or in a greenhouse, you may need artificial lighting. Use fullspectrum LED grow lights for optimal plant growth.
Step 5: Add the Nutrient Solution
Mix the appropriate hydroponic nutrients in your water reservoir. The nutrient solution typically contains a combination of nitrogen, phosphorus, potassium, calcium, magnesium, and other essential trace elements that plants need to thrive. It’s important to regularly check and adjust the pH and EC (electrical conductivity) of the solution to ensure it’s within the optimal range for plant growth.
Step 6: Monitor and Maintain the System
Hydroponic farming requires ongoing monitoring and maintenance to ensure the system is functioning properly. Here’s what you need to do regularly:
Check pH and EC levels: Ensure the nutrient solution is at the optimal pH (around 5.5–6.5) and nutrient strength (EC) for your crops.
Inspect the Water Pumps and Air Pumps: Make sure your pumps are working efficiently to circulate the nutrient solution and provide oxygen to the roots.
Maintain the Nutrient Solution: Change the solution every two weeks to prevent the buildup of salts and to ensure your plants receive fresh nutrients.
Monitor Plant Health: Look out for any signs of nutrient deficiencies or diseases. Keep your plants healthy with regular trimming, and remove any dead or damaged leaves.
Step 7: Harvesting
Once your plants are ready to harvest, carefully cut them with clean scissors or knives. Hydroponics farms typically see faster growth rates than traditional farming, so you’ll have quicker turnaround times and multiple harvests throughout the year.
Step 8: Market Your Produce
After successful harvesting, you can sell your hydroponically grown produce directly to consumers, local markets, or through online platforms. Some farmers even collaborate with restaurants or organic food stores to sell fresh, pesticidefree produce.
Benefits of Hydroponics Farming in India
Water Efficiency: Hydroponics uses up to 90% less water compared to traditional farming methods, which is especially important in waterscarce areas of India.
Higher Yields: Plants in hydroponic systems often grow faster and yield more than those grown in soil.
Space Efficiency: Hydroponics can be practiced in smaller spaces, such as rooftops or greenhouses, which makes it suitable for urban farming in crowded cities. PesticideFree: Hydroponic farming can reduce the need for chemical pesticides, promoting healthier, chemicalfree produce.
Conclusion: Hydroponics as a Sustainable Farming Solution in India
As the demand for organic produce grows and traditional farming faces challenges like water scarcity and declining soil fertility, hydroponics farming presents a promising alternative. By following this stepbystep guide, you can set up your own hydroponics farm in India and contribute to the future of sustainable agriculture. The initial investment may seem high, but with the right knowledge and proper maintenance, hydroponics can be a highly rewarding and profitable farming venture.